Thursday 28 June 2012

Chocolate Peanut Butter Pie

 Who likes oreos?

Who likes chocolate?

Who likes peanut butter?

(If you have not had you hand raised for the duration of this short questionaire... shame on you!)
I thought to myself, what's the best kind of cookie to put in a pie crust. I love my fair share of Grahams, but let's be honest, if an oreo and a graham were in a boxing ring, the oroe would win, hands down. Besides, grahams have none of that creamy white filling.

The creamy white filling seals the deal.

Then what to fill that dreamy pie crust with?

I was caught between chocolate and peanut butter, then i thought: "Heck, let's try both."

If peanut butter and chocolate had a baby, it would be this pie crust. And if you gat a little bit of each in every heavenly mouthful, you will never ever desire another pie ever again.

possibly.


Oreo Cookie Pie Crust
makes: one 9 inch pie, prep 10 min
Source: Chaos in the Kitchen

24 Oreo cookies
1/4 cup butter, melted

Preheat oven to 350°F. Place Oreos in a food processor until finely groud, like coarse sand. The filling should resemble moist crumbs. Empty crumbs into a mixing bowl and stir in melted butter until well combined. Pat wet crumbs all over and up sides of pie dish, making an even surface. Bake crust for 8-10 minutes or until hardened. Cool before filling.

Chocolate Peanut Butter Pie Filling

1 pie shell prepared and baked
Crunchy Peanut Butter, to taste
2 cups milk, any (I used 1%)
3 egg yolks, beaten
3/4 cup sugar
1/4 tsp salt
5 tbsp flour
3 tbsp cocoa
2 tbsp butter, chopped
1 tsp vanilla

Add a thick layer of peanut butter to the base of the pie crust. Combine milk, egg yolks, sugar, salt, flour, and cocoa in a cold saucepan. Stir thoroughly to combine. Turn heat to medium, stir constantly until thick but do not boil. Once thick, remove from heat, stir in butter and vanilla. Let mixture cool slightly and pour into baked pie shell. Chill before serving.

Sunday 24 June 2012

Homemade 'Crunchie Bars'

First, a disclaimer.
My own homemade crunchie bars were a tad sticky, although i must blame this 100% on the horribly hot and humid weather we have been having off late. I hate the way terrible weather can make a fantastic dish under perform.

Nevertheless, they were delicious stick. I am the kind of girl who adores her fair share of ooey-gooey sticky finger treats. Soft toffee? Bring it on.

Whether you live in the tropics, or are experiencing blissfully dry and cool-ish weather (ahemmm lucky you), this is wonderful. Especially if you have used up your candy-bar money stash, and a craving a good ol' crunchie bar. 

Love those buggers.

If you are not so much of a chocolate person, (what is wrong with you?) skip the chocolate topping and you will still have yourself a nice crunchy chewy, sweet treat.


Homemade 'Crunchie Bars'
Makes: About 8 'finger-sized' bars
Source: At Down Under

For the honeycomb:
50g granulated sugar
2 tbsp honey/golden syrup
3/4 tsp baking soda
Almond slices (optional) (I like an extra crunch in my crunchie bars, eh?)

Chocolate topping:
1/2 cup milk chocolate morsels
Splash of milk
White chocolate morsels (optional) (or is it?)

Prepare a cake tin lined with baking paper or use a silicone pan. In a sauce over medium fire, mix sugar and syrup/honey and stir together to mix. Let the mixture melt and stir until it starts bubbling – Between 3-5 minutes. Off the heat, add baking soda and stir. Syrup will foam. Pour it in the prepared pan and top with almond slices. Wait for it to harden before topping with chocolate.

Over a boiling water bath, melt the milk chocolate morsels and milk until smooth. Pour over hardened honeycomb and top with white chocolate morsels. Once chocolate has hardened, cut into 8 slices, or break it up into tiny 'bite-sized' pieces.


Yes, it is.

Saturday 23 June 2012

Grass Jelly Drink

On a hot day (which is happening increasingly so as we progress into July), I always feel like popping over to the nearest food court to get myself a glass of nice, cool grass jelly. Of course, this would be counter-productive. The nearest food court is not near at all. I would be victim to the hot equatorial sun on the way there, and back.

Getting a grass jelly drink to cool me down would serve no purpose.

Until I came upon a curiously black jelly vacuum-packed in a tube just like tofu. What is this oddly coloured confectionery?

Grass jelly! For slightly over a dollar, I bought myself a tube. No harm in trying. After googling to find out how to transform my brown-ish jelly into my favourite refreshing, jelly-bits-at-the-bottom beverage, I hit the jackpot.


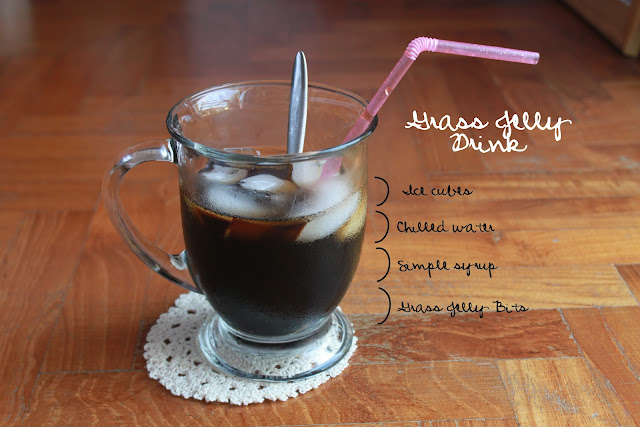
Grass Jelly Drink
Serves: 1
Source: Red Cook

4 oz unsweetened grass jelly, sliced or cubed finely
3 oz chilled water
Simple syrup, or sugar, to taste
Ice cubes

At the bottom of your grass, lace the sliced grass jelly and add the chilled water. Stir well until the drink has a consistent colour and add syrup. Top off with ice cubes, yum!

Notes:
1) You could easily cut down on the sugar if sweetened grass jelly is used
2) Mix it up! Try adding 3 oz of soy milk instead of water.
3) For a richer taste, gula melaka syrup or brown sugar can be used

And, nothing is a proper grass jelly drink without a nice fancy straw. The bigger, the better. All I had was a really narrow one so I had to scoop up my jelly bits with a spoon. 

If you have never seen or heard of grass jelly before, pop down to your favourite Asian supermarket or the like. Trust me, the trip there is worth it. Buy a tonne of jelly and save the future trips, because you will be drinking five cups of these a day.

And, grass jelly has supposed healing properties. Hell, have seven cups a day.

Friday 22 June 2012

Follow my blog with Bloglovin

Homemade Butterscotch Kettle Corn

I don't knot about you, but whenever someone offers me a bag of Garrett Popcorn, I cannot say no. Literally. Sometimes i even say 'yes' without even being offered.

It's that bad.

So whenever I walk past a Garrett store, I have to stop in my tracks. No matter what. Even if a man walking at an incredibly fast pace while holding a mug full of hot coffee is just behind me.

I stop to inhale, and force myself not to buy any because I (a) have no money for popcorn; and (b) am currently covered in scalding hot cappuccino.

Somewhere around this time, I figured that kettle corn can't be that hard to make at home.
I was right.

It is easy! Breezy!
And now I can consume a tonne of ooey gooey butterscotch kettle corn in the comfort of my own home. Without another to point and stare and marvel at the rate I can shovel it into my mouth.

Alright enough talk, recipes speak for themselves.

Homemade Butterscotch Kettle Corn:
Makes: 8 1-cup servings (but let's be realistic, 1 8-cup serving)
From: Jenny Jones Recipes (here's her video!)

For the popcorn mix:
8 cups freshly popped popcorn, unpopped kernels removed (I used my popcorn machine, but you can easily use a microwave or a stovetop)
3/4 cup pecans nuts, halved

For syrup:
5 tbsp unsalted butter
1/2 cup brown sugar
1/4 cup corn syrup
1/2 teaspoon salt
1/2 teaspoon baking soda
1/2 teaspoon vanilla

Preheat oven to 120ºC. Place popped corn into a large bowl. Place the nuts on top. Do not mix yet.

Heat the butter, brown sugar, corn syrup, and salt in a small saucepan. Bring to a boil, stirring until butter is melted. Reduce heat and boil, undisturbed and uncovered, for 5 min. Remove saucepan from heat and stir in baking soda & vanilla.

Pour the syrup over the nuts & popcorn, stirring quickly. Spread the mixture onto an ungreased baking sheet. Bake for one hour, removing briefly every 15 minutes to stir. Spread the mixture onto wax paper to cool. It will seem sticky at first but it will dry up nicely.


I may even like it a teensy tiny bit more than garrett popcorn because it is less sickeningly sweet. Plus, I've got my pecans in there. Gotta love 'em pecans.

This triggers my...

Question of the Day
Do you pronounce pecan as PEE-CAN or PUH-KAHN?
I have recently started pronouncing it as the latter and I am getting some pretty weirded-out looks my members of the public.


Peanut Butter 'Cookie Dough' Balls

There are two things you must know about me. Well, amongst others.
1. I have a strong suspicion that the peanut butter i eat has started running through my veins
2. I like dried fruit even more than real fruit

So what other way than to start off my first post with these. If i were a cookie in my former life, I would have been these. No doubt.

I know that the trend recently is to use dates in everything, from cookies to granola bars. I have never ever set my eyes upon a real-like larabar, but i could imagine. I have seen recipe after recipe using blitzed up dates.

You see, I don't have dates here. Not unless you are willing to spend $20 on a 50g bag (I may love dried fruit, but not that much).

It is possible to use raisins instead, but I was afraid of failure, of dissapointment, and that my rusty old food processor will give it's final choke if i stuffed it with raisins and nuts to creamy-fy.

Until.
Until:

Third random-fact-about-Me: I spend possibly 4/5th of my awake-time on Pinterest. And now it has paid off.

The original recipe is from Chocolate Covered Katie, and I was sold. Peanut butter? Raisins? Roasted peanuts? No ingredient-I-would-have-to-ride-my-bicycle-under-the-hot-equatorial-sun-to-the-market-to-obtain?

Alright. I was willing to put my food processor's life on the line here.

Katie has an endless list of date-based bars and cookies. And this was the one I saw that used raisins in the initial recipe. My chance of failure was 50% less.

I didn't change much of her recipe. Not at all, in fact. I did not want to go horribly wrong and end up with raisin-peanut mush.

I did not. I ended up with this:


Peanut Butter Cookie Dough Balls:
Makes: 12 'cookies'
From: Chocolate Covered Katie

1/4 cup peanut butter
1/4 cup plus 3 tbsp raisins
Dash of salt
2 tbsp roasted, unsalted peanuts
1/8 tsp pure vanilla extract

Place all ingredients into a food processor and combine until smooth. You can make little cookie like I did, or even granola-bar-esque shapes.

Katie says it is sugar-free and gluten-free.

It's also leftover free, that's for sure.

Now I have something to pack in teensy little lunch-boxes just to give me a reason to go to school.